Citra satelit dari Google Earth memiliki kelebihan yaitu memiliki historical imagery, yang dapat diakses melalui butang berbentuk jarum jam dengan panah berputar berlawan arah jarumjam (Counter Clockwise)
Show historical imagery on Google Earth
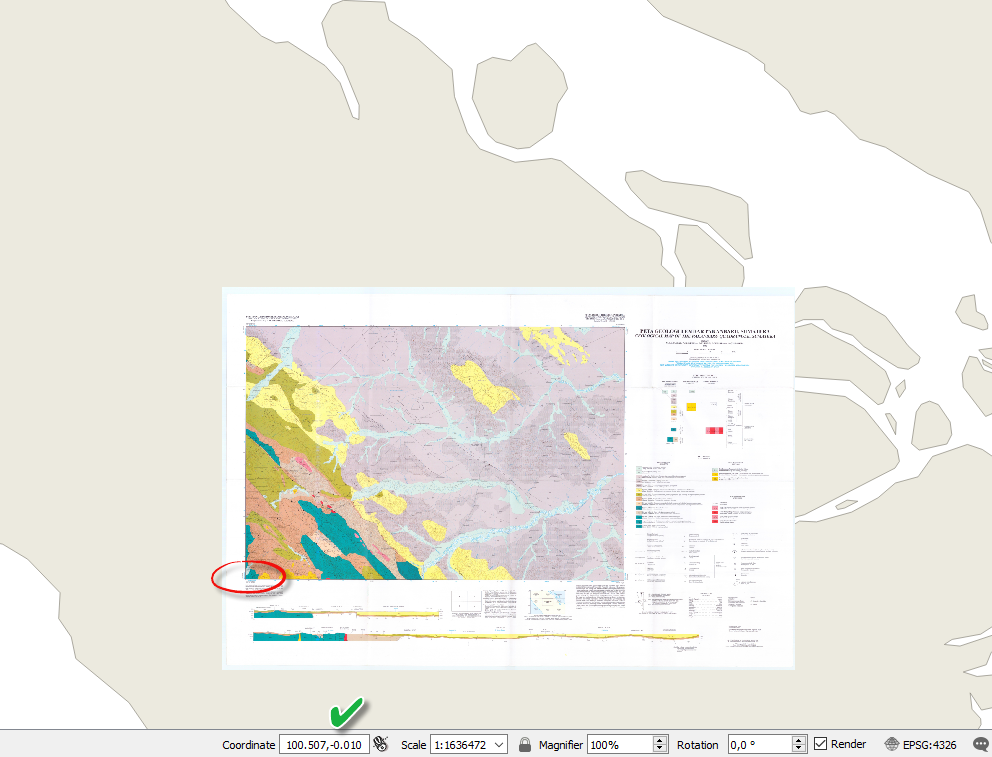
Latihan kali ini, kita akan melakukan kembali georeferencing, seperti latihan sebelumnya. Namun, kali ini kita tidak akan memasukkan koordinat lagi, tetapi menggunakan patokan peta yang telah dibuka sebelumnya.
Download peralatan tempur dahulu
Sila download (unduh) dahulu file latihan kita di Google Drive saya berikut:
Pada folder tersebut, sudah saya buatkan sebuah project QGIS, yang telah diisi layer XYZ ke Esri World Imagery, dan sebuah KML file yang dibuat dengan Google Earth
Berhubung ini masih kuliah minggu ke1 (buat mahasiswa PERMATA) / minggu ke2 buat mahasiswa regular UIN Suska Riau, maka, saya sertakan saja dahulu tile XYZ dan KML nya.
Pertemuan berikut, kita akan belajar membuat sendiri.
Tiga buah gambar JPG
Pada folder tersebut telah tersedia juga 3 buah citra satelit hasil export dari Google Earth.
Jika Ananda ingin membuat sendiri, pastikan posisi gambar direset sebelum di export dengan menu View -> Reset -> Tilt and Compass. Dengan begini, gambar tidak tilt (mereng , tetapi sudah “ortogonal”, terlihat dari atas), dan sudah lurus ke bagian true north (utara sebenarnya) di bagian atas.
Reset Tilt and Compass agar gambar lurus sebelum di export
Namun, ananda tidak harus melakukan ini sekarang, karena gambarnya sudah saya export. Saya khawatir Ananda belum mendownload Google Earth Pro.
QGIS Enable Snapping
Snapping memungkinkan kita memilih vertex lebih akurat, dan dapat menghindari kerusakan vector karena tidak menempel / mengunci.
Snapping terkadang tidak ter-enable by default, karena dikahawatirkan membingungkan pemula.
Kali ini, kita membutuhkan snapping nya on ke verteks. Artinya, begitu mouse kita mendekati titik verteks, posisi mouse akan “terkunci” ke verteks tersebut, sehingga koordinat lebih presisi.
QGIS Settings -> Options …
Untuk meng-enable snapping, buka dulu opsi QGIS dari menu Settings -> Options…
Supaya lebih cepat, diketik saja snap, agar cepat dicari…
Pastikan snapping nya on (dicentang) dan kita gunakan 30 pixels.
Artinya, posisi mouse akan menempel ke titik verteks terdekat 30pixel.
Tanda snapping sudah bekerja adalah dengan adanya tanda kunci ke verteks terdekat saat kursor mouse mendekati sebuah titik
Georeferencing
Sekarang, buka Raster -> Georeferencing, dan buka gambar kita
Zoom in (scroll mouse) ke sebuah sudut kotak pada gambar.
Kali ini, kita tidak akan memasukkan koordinat seperti kemaren, tetapi milih kotak tersebut pada QGIS (lihat ilustrasi gambar angka 3)
Pilih verteks yang sesuai dengan koordinat kita, pada contoh adalah kiri atas
Pastikan snapping terlihat, sehingga kita pilih adalah titik verteks nya.
Koordinat X dan Y sekarang otomatis diisi oleh QGIS
Nah, buat yang penasaran kenapa angkanya besar sekali, karena kita sekarang otomatis menggunakan CRS 3857 (Pseudo Mercator) baca: sudo merkator, atau koordinat Google, dalam meter dan bukan derjat lagi seperti WGS 84 / EPSG: 4326
Ini bisa dilihat dari status bar pada pojok kanan bawah QGIS
terlihat residual kita sangat kecil, karena posisi kita menempel dengan semprulna
Lakukan terus untuk 3 titik berikutnya
Residual terlihat kurang dari setengah pixel… kalau peta scan kemaren hingga 20pixel
Kalau residual belum keluar, dikarenakan belum kita setting transformasinya. Silahkan disetting kembali (jika belum)
Untuk sementara abaikan saja EPSG nya, karena kita linear, kita hanya butuh membuat World File.
Untuk hasil yang lebih presisi, Ananda bisa menggunakan projective pada type transformasi, namun akan menghasilkan berkas raster baru, berbentuk GeoTIFF, dan biasanya cukup besar ukurannya, walaupun sudah dikompres dengan DEFLATE, apalagi kalau tidak dikompres.
Sekarang kita linear saja, karena gambar tidak tilt dan tidak terputar (sudah direset tilt dan compass nya)
begitu dipencet tombol start, akan masuk gambar kita ke sebuah layar baru di QGIS, namun CRS nya masih tanda tanya … walaupun sama dengan CRS kita sekarang, 3857, sudo merkator
Kalau Ananda risih, atau ingin mengganti koordinat CRS QGIS nantinya, silahkan saja dipencet tanda tanya tersebut, dan pilih 3857
Pilih Pseudo-Mercator, yaitu proyeksi XZY tile atau terkadang dibilang proyeksi Google Map
Copy WLD
Selamat! Ananda sudah bisa me-rektifikasi / meng-geo-referensing gambar.
Berhubung gambarnya sama koordinatnya, hanya berbeda temporal nya saja (waktu nya saja), maka kita dapat saja meng-copy kan WLD nya menjadi WLD file gambar yang lain …
Silahkan copy dan rename file, sesuai dengan nama file gambar yang lain
Drag and drop / seret dan jatuhkan dua gambar yang lain ke QGIS,
Opsional: agar rapih, dijadikan Group
Sedikit tips agar rapih, pilih ketiga gambar, lalu jadikan group. Pilih ketiganya, klik kanan, pilih Group Selected. Sebenarnya ada juga tombolnya… silahkan cari sendiri di atas layer
Nah, kelebihan dari group, bisa kita buatkan mutually exclusive. artinya, hanya satu gambar yang bisa hidup. Mirip radio button, tetapi radionya masih pakai checklist di QGIS ini … hahaha
Trouble Shooting / Error
Jika Ananda ada yang ragu, dan ingin melihat file yang saya hasilkan, ada saya upload juga file final nya … cukup move / pindahkan berkas tersebut ke folder kerja Ananda …
Download 0816 PAKANBARU. It’s quite huge, around 11 Megabyte
Load Georeferencer Plugin
If Georeferencer submenu is hidden from your raster menu, try to enable it from Plugins menu
Open Georeferencer window from Raster -> Georeferencer
Load our raster
Add a GCP point by clicking on the raster, with toggle button is on. Type 100 then space then 30, since our top left coordinate is 100 degree 30 minutes East (Bujur Timur)
You’ll see new GCP is being added from GCP Tables, below Referencer window
The faster way to zoom out is by clicking Zoom to layer
Click Zoom in, then, drag other corner of your scanned map
Click add point again (1), click on map (2), type the coordinates (3 & 4), then, click OK
After completing all four corners, now click Transformation Settings. Since we know this is a scanned map, we can use Linear transformation. We will not produce any GeoTIFF image, just check / thick Create World File Only (Linear transforms). OK
After setting in transformation, you’ll see residual ERROR in pixels is being added. 10 pixels is HUGE ERROR, but, since this is only for your assignment, just let it be. The error is introduced by the scanned map is not fully pressed, hence we can see some miss-alignment
Now, press that Start button
You’ll see our raster is being added into our QGIS … some time in old version of QGIS, you’ll being asked with what CRS is or raster. Just put 4326 if being asked.
Press (?) question mark button on right side of your raster. You’ll being asked with which CRS is should be for this raster. Pick 4326, WGS 84
BTW, we can safely close our Georeferencer window, and it will ask whether to save the points. Save it, so You don’t need to repeat adding all four points again.
If you do it correctly, your raster, scanned map, will be placed on top of Sumatera Island, just below Rupat Island, and Meranti to the right.
University of Columbia has pre-built GeoServer WMS serviced image promoted to their page. Those images are not globally covered earth…. since they only cover from altitude of -60 (south) up to +85 north
bbox=-180,-60,180,85
Most NASA global images are covering up from south pole to north pole …. i.e. from altitude -90 south up to +90 north …
Since it is a GeoServer WMS service, you can easily change the bbox (Bounding Box) back into whole globe, which is:
bbox=-180,-90,180,90
and do not forget to change WIDTH and HEIGHT also
width=5400&height=2700 (for 8km resolution or about 0.06667degree)
or
width=10800&height=5400
for 4 km resolution (about 0.03333 degree)
8 km and 4 km resolution
Since the 8 km and 4 km are usual resolution for global coverage, we can easily create WLD (World File) from other raster which has same resolution …
I put them also into Google Drive … if you curious
Now, since we have our WLD already, we can open our raster into QGIS or ArcGIS, and will be align automagically …
What about 2km resolution?
Well, Uni GeoServer seems to be set to only allow 800Mega Byte of memory to use to render our WMS raster.
If you want to make greater resolution, you will need to split our bbox
MySQL is not mainly intended to spatial query, whilst still has some usable inbuilt functions as WebGIS back-end.
I do prefer PostGIS as database for every WebGIS project that me or my student develop.
BTW, to be honest, MySQL is quite fast, simple and easy to deploy and host. Almost every shared hosting (both paid and free like 000webhost/hostinger) provide MySQL with spatial query functionality.
If you want to deploy PostGIS, you need to pay for at least VPS (virtual private server) service and install (configure) linux, postgreSQL, apache/ngix by your own … and it took time and also pricy ( IDR 200k monthly) compared to SharedHosting (IDR 150k annually)
Why MySQL
If you only want to show some POINTs , POLYGONs or POLYLINEs, doing simple spatial query like * building (constructing) features, * spatial relationship (like CONTAIN / WITHIN, intersects, touches) * creating GeoJSON / Text / WKT (Well Known Text)
You can count on MySQL or MariaDB
Measuring Area / length and projecting is sucks in MariaDB, but you can use Google Maps API or Leaflet or any JavaScript library to help you with it.
Why or When You Should Not use MySQL
If you are developing big GIS project, with heavy spatial functions (like those who had been provided by PostGIS, creating / projecting rasters, and as a database-back-end for your Desktop GIS (like QGIS or ArcGIS), then … please go with PostGIS
But … it’s only my own opinion … based on what I’ve been tinkering along.
What about Oracle / SQL Server?
Well, Oracle is too complicated for GIS… IMHO, and also the license. It just too heavy for me. Oracle is best suited for banking / finance.
Ok… now back with MySQL
If you still reading this paragraph, either you’re a geek or crazy … or you’re my students who’ve been assigned to read this post.
If you want to use MariaDB, please download it here.
please back-up your old MySQL Databases … Lots of my students using XAMPP,
Old MySQL (like 20 years ago) using MyISAM as engine, so, you can easily zip mysql data folder then … it’s your back-up… you can copy-paste it into newer version or you friends laptop.. and will installing automagically.
But, InnoDB Engine is some how different.
You need to DUMP your old databases into SQL file, then, import it again on your new location / version.
I have back-up my old databases, now what?
OK, please proceed to install your MariaDB …
Removing old XAMPP service on MySQL is somehow helping a bit …
Make Sure You also install HeidiSQL (included within installer)
HeidiSQL is like TOAD at oracle, GUI client, powerful enough.
For old man like me, who love PHPMyAdmin a lot … learning HeidiSQL is like cheating with other girls … but …
Create ODBC account on your new MariaDB
ogr2ogr using ODBC to connect to MySQL, so … creating credentials for ODBC is will save your time next time
ERROR on creating table on your MySQL Database (if you have not providing user)
Click button whose icon like 2 people avatar, titled “Manage user authentication and privileges”
Click Add,
Type a new User name
If you only want to restrict ODBC user to messing with your GIS database, and not other precious databases, you can set it here.
easily creating table from your SHP file with ogr2ogr -f MySQL
Some Demo on SQL
If you’re my student, I will provide you with three tables: desa, perusahaan and sma
SELECT s.nama_sekolah,s.kec, upper(s.desa), b.desa FROM sma s, bps_podes2014_riau b WHERE ST_WITHIN(s.SHAPE, b.SHAPE) AND upper(s.desa)<> b.desa
Previous image, showing you how to use ST_WITHIN, an SQL function to test whether sekolah shape within wich desa’s polygon
You’ll see that some geo-referenced location is some how are quite different with sekolah own column.
Next exercise … window query (aggregate) on spatial query
perusahaan table has no location field but POINT …
we can create their location field (kabupaten/kota, kecamatan or desa/kelurahan) from desa table …
The other useful query is window query … a simple count over partition
With window query, we can count how many perusahaan within specified kabupaten kota or kecamatan …
In the previous session the deductive method was used, but in this session we will employ the inductive approach. This approach consists of using known sites to examine the behaviour and patterns of humans in the past. By relying on both the deductive and inductive approach we can have a better understanding of the human […]
The Ordnance Survey grid conversion is usually required when dealing with some projects across the UK. Usually, along with the standard WGS 84 datum, we need to define X (Easting) and Y (Northing) coordinates. This task might be quite time-consuming when converting our locations one by one. Fortunately, we have some tools, which can do […]
Commonly, every map should be able to represent the location information of the area of interest along with its Shape Scale/distance Area If we are looking simply for the answer of “where?” from the map, Geographic coordinate system is enough, which map provide the location in degree decimal units. We can’t get actual measurements of […]
I just released a new edition of my introductory QGIS manual for QGIS 3.16 Hannover (the current long term release), and as always I’m providing it under Creative Commons for classroom use and self-directed learning. I’ve also updated my QGIS FAQs handout, which is useful for new folks as a quick reference. This material will […]


Anda harus log masuk untuk menerbitkan komentar.